Best Homemade Brownies

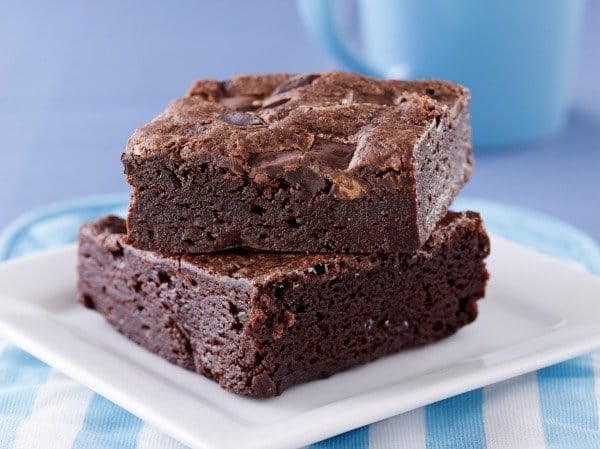
My Best Homemade Brownies recipe produces perfectly fudgy brownies that are moist on the inside, crinkly on top, and full of chocolate flavor. They are super easy to make, and everything is mixed in one bowl which saves on the washing up!
Best Homemade Brownies
We have experimented with many variations of Homemade Brownie Recipes, and the family has declared this THE BEST HOMEMADE BROWNIE RECIPE!
My recipe produces the perfect brownie every time, a fudgy, chocolaty center and that crispy, crinkled top.
Brownies are such an easy bake and my homemade brownie recipe ensures brownies that taste better than any store bought brownie mix you can buy in a box.
The recipe below does NOT include nuts, due to an allergy, but you can certainly add some in, and the pictures include a version with nuts! So it all comes down to personal choice.
For those needing a gluten free brownie, try these phenomenal gluten-free brownies! These brownies are chewy, deeply fudgy and have that perfect crackly top! Plus they’re easy-to-make!
How to make Best Homemade Brownies:

- Preheat your oven to 350 degrees F.
- Spray pan with nonstick baking cooking spray.
- Get out a medium sized mixing bowl, and a rubber spatula.
- Combine the dry ingredients in the bowl.
- Fold in the wet ingredients right into the dry ingredients.
- You CAN using a mixing stand or hand mixer if desired, just keep it on low.
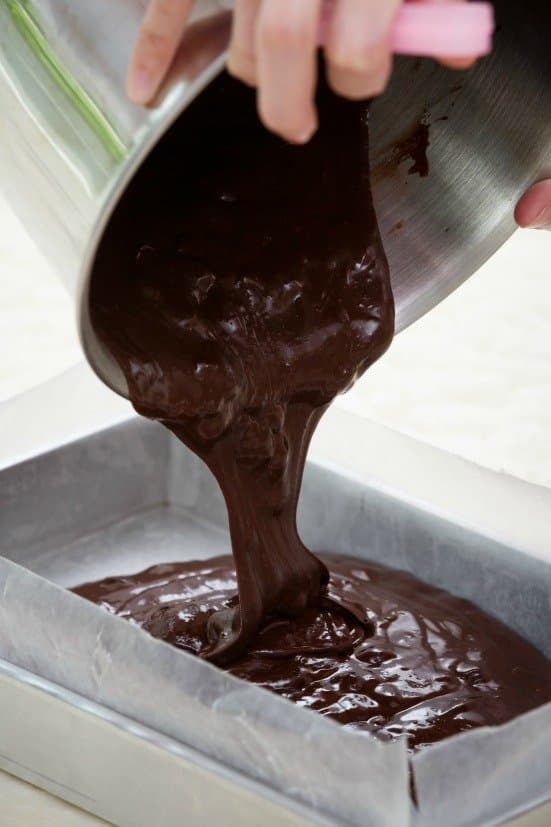
- Stir until just combined, then pour the batter into a pan and bake.
- Once you remove the brownies from the oven, set them aside on a wire rack to cool slightly.
Best Chocolate Brownie Recipe Ingredients:

- BUTTER: I use 1 stick of unsalted butter, which is melted before adding to the brownie batter. You can also use salted butter, but don’t be tempted to use margarine.
- SUGAR: I’ve used granulated white sugar to sweeten these brownies.
- VANILLA: The brownies are flavored with vanilla extract as it has the best flavor. You can use vanilla essence at a push.
- FLOUR: I use self raising flour, if you use all purpose flour you will need to add 1/4 teaspoon of baking soda and 1/4 teaspoon of salt).
- EGGS: 2 eggs are added to the brownie batter.
- COCOA POWDER: The chocolate flavor comes from cocoa powder, I use Hershey’s.
- NUTS: You can add your choice of nuts to the brownie batter, if desired
Flavor variations:
These easy chocolate brownies are perfect as they are, but brownies are also a great bake for adding in extra flavor and texture to. Here are some ideas:
- For an extra boost of chocolate flavor, stir through some milk chocolate or white chocolate chips.
- To add nuts, finely chop about 1/2 cup of nuts and stir through the brownie batter. Pecans, almonds and walnuts would be idea.
- Play with the flavors and add some mint chips, peanut butter chips, or caramel chips.
- Stir through some finely shredded orange zest for a chocolate, orange brownie.
Recipe hints & tips:
- Spray or line your pan with baking paper: Spray the pan with oil, or line it with baking paper, this will make removing the brownies a whole lot easier once they’re baked.
- DO NOT over bake: Brownies baked too long will end up dry and crumbly. Start checking the brownies 5-10 minutes before the recipe says that they should be done. Insert a cake tester in the center to check they are done. It should come out clean and dry, without any batter on it.
- Add an extra egg or egg white: Adding a WHOLE egg will give you more cake like brownies. Adding an extra egg YOLK to make them chewier.
- Use a dusting wand to lightly sprinkle over some powdered sugar just before serving.
Serving suggestion:
Although you can serve them hot or cold, I think they are best served warm and gooey! Enjoy them as a dessert, warm with a scoop of your favorite vanilla ice-cream. Or serve them cold as an afternoon treat with your favorite hot drink.
Brownies also make a great addition to pot-lucks or school bake sales.

FAQs
What makes brownies fudgy vs cakey?
The secret to a proper fudgy brownie is the fat-to-flour ratio. Fudgy brownies are higher in fat than cakey ones. Cakey brownie recipes contain more flour and usually some baking powder to help them to rise. So to ensure that gooey, fudgy center make sure you use plenty butter and chocolate.
Should I use a metal or glass pan to make Brownies?
You can use either! I find that my metal pans result in crunchier edges, and I need to reduce the oven temp by 25 degrees. With a glass pan, you may need to add about 5 minutes of baking time. You can also use a Brownie Bar Pan if everyone prefers crunchy edges!
How to store leftover Homemade Brownies:
Slice leftover brownies into individual squares and store in an airtight container at room temperature; they’re best eaten within 1 to 2 days.
How to freeze Brownies:
To freeze brownies, allow them to cool completely, but do not cut them into individual servings. Wrap them up tightly in plastic wrap, then wrap again with heavy duty aluminum foil, and place inside a large freezer safe ziploc bag. You can freeze up to 3 months, so be sure to LABEL AND DATE before placing in the freezer. When ready to serve, thaw at room temperature before cutting into individual servings. You can warm in the microwave or oven before serving, if desired.


Don’t miss these additional delicious Brownie Recipes here at When Is Dinner:
- Brownie Christmas Trees
- Chocolate Mint Brownies
- Frankenstein Brownies
- Strawberry Cheesecake Brownie Cups
- Mummy Brownies
- Christmas Tree Brownies
- Frosted Brownie Bites
Homemade Brownies
Ingredients
- 1 Stick Butter, melted
- 1 cup sugar
- 1 tsp vanilla extract
- 1/2 cup Self Rising Flour (if you use All Purpose, add 1/4 tsp Baking Soda and 1/4 tsp Salt)
- 2 eggs
- 1/3 cup Cocoa Powder (I use Hershey’s)
- Choice of nuts, if desired
Instructions
Preheat oven to 350.
Spray 9 inch baking pan with non-stick cooking spray.
Melt butter on stove top
Mix melted butter, sugar, and vanilla extract in a small bowl
Add eggs to mixture, stirring well
Mix dry ingredients in a medium bowl (flour and cocoa powder)
Add wet mixture to the dry ingredients bowl until well blended
Pour into baking dish
Bake 20 minutes
Nutrition Information:
Yield:
9Serving Size:
1Amount Per Serving: Calories: 249Total Fat: 13gSaturated Fat: 7gTrans Fat: 0gUnsaturated Fat: 5gCholesterol: 68mgSodium: 188mgCarbohydrates: 30gFiber: 1gSugar: 22gProtein: 3g

I’m thrilled to hear you enjoyed them!!!
Make sure you’re subscribed via email for notices when new recipes are posted – I have an Oreo Brownie recipe coming soon, and they’re SOOOOOOO GOOD, HAHA!
I made these brownies and they are delicious! I did not have any vanilla extract though but they still turned out fantastic! Thank you so much for this recipe! My first time making brownies from scratch and thanks to you they were a huge hit with both my husband and I! Will be making them again very soon!
I’m thrilled to hear that you enjoyed them 🙂
These look so delicious and not too hard..Even I could do this 🙂
Wonderful little brownie! Not too thick, not too thin, just right! Comes together and into the oven quickly. I added about 1 additional T. of cocoa. Just mix all ingredients with a wooden spoon in the same pan as you melted the butter, about 50 strokes, just until good and combined. Had to try 3 of the brownies as soon as they were cooled, just to be triply sure they were good.
This looks amazing and looks delicious
Will have to try and make these. Look so good@!
The pictures made my mouth water and my chocolate cravings kick in! Luckily I have all the ingredients on hand!!!
Look amazing
I love brownies! They are an awesome dessert. Soooo Yummy!
I enjoy brownies and trying different types of recipes.
I love brownies and these look delicious
Very easy and home made is so much better than the mixes. They make the perfect dessert for summer picnics.
I would love to try this recipe with a little peanut butter. I love peanut butter and chocolate. So good
I cannot get over how chocolatey and moist your brownies look! The ingredients take me back to baking with my mom when I was little. She would always let me help with recipes calling for vanilla extract because she knew how much I loved the fragrance. This will be the perfect snack to top off with a cold glass of milk.
So good. I will never make boxed brownies again. Thank you so much for this great reipe
This sounds yummy! I love baking, I’m planning on trying this recipe today.
I haven’t had a brownie in a looong time but I must really want one because I had a dream last night that I was eating some.
These brownies would make a great little gift idea. Most everyone loves brownies. Thank you again for this recipe
These are great. Thank you for this awesome recipe. God Bless
These look divine! Thanks for sharing your AMAZINGLY YUMMY recipe =)
This would make a great dessert for company. So good with a scoop of ice cream. Thank you so much for sharing
Nothing better than warm brownies with vanilla ice cream topped with chocolate sauce. Always love trying new brownie recipes!
I am so hungry for brownies. Maybe today will just be the day. Thank you for sharing
Good idea to make these in a small pan.
I love brownies alot. I have never made homemade. I need to give this a try. Nothing like fresh desert instead of boxed. Thank you again
Homemade brownies are the best. Thanks for a new recipe to try.
I am always looking for good brownie recipes. Thank you. My family loves chocolate so this will be a great help.
Adding ingredients to shopping list now! Going to make a batch for today’s picnic!
I used to always make my brownies from scratch – sadly I have succumbed to the convenience of the boxed mixes. No longer… I will definitely give these a try! Thanks for sharing.
Oh yum! We really love brownies. I will have to try this recipe.
I can always use a new brownie recipe 🙂 The kids are always happy with anything chocolate! I usually try to add some other ingredient too, such as a nut or a dried fruit in them too 🙂
I will try this recipe since my family loves brownies…
I usually buy boxed mixes for brownies, but these look so simple I am going to try them. I love nuts so I will definitely be adding some. Maybe adding a caramel drizzle to the top too.
I love brownies. This sounds like an easy recipe. I will give this a try. Thank you
Brownies are always a tasty treat 😀
I haven’t made homemade in forever. Usually use the box. This sounds amazing
This is an easy recipe! You’re a great mom to make the kids brownies for after school. I’ll have to pin this to my Pinterest board. Thank you for sharing.
I’m on a diet so these don’t really appeal… I will pass along.
They look scrumptious but unfortunately we’re both doing Weight Watchers and she’s given up sugar pretty much for life. I’ll pass the recipe along to DD#2 so she can bake them for the rest of the family.
Num! These brownies look delicious. I’ll have to give them a try!
I love brownies, nuts or no (no allergies here) so thanks!
I bet the boys devour them! They look good with simple ingredients and easy to make. I like how you talk about topping them. These could easily have things added on sprinkled on.
How cute to think of your littles devouring your warm brownies. I bought a 9″ pan most for brownies, it is perfect like you say! This sounds delish and easy!! I want to try this new brownie recipe!
my son has been asking for brownies but not the kind I make lol thanks for the post
Love, love, love brownies!!! Thank you for sharing the recipe with us!!!